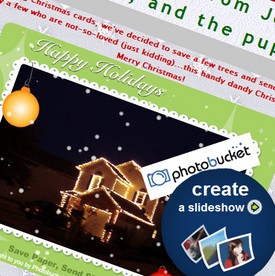
 Now that we’ve all decided to live green and simultaneously earn mega cool points by creating a nifty, free, Christmas eCard slideshow AND learned what the environmental benefits are of creating said eCard, let me show you how to go about doing so.
*Note: This is part 3 in the Christmas eCard Slideshow series*
Buckle your seat belts boys and girls, we’re about to embark on a simple crash course on our way to a free, beautiful, Christmas ecard.
You’ll need a few simple things before we begin: a few pictures, a free account with PhotoBucket.com, and a little bit of time (between 15-45 minutes (or more, depending on how creative you want to get).
How To Create Your Christmas eCard Slideshow in 15 Minutes or Less:
Step One: Upload your eCard pics to PhotoBucket.com:
- To do this, simply log in to your account and either select the image files from your computer by clicking “Browse”, or select the location of the image from the top menu.
- The location choices are: your PC, web url, mobile phone, or video (which we’ll not get into here in this guide)

Step Two: Click “Create SlideShow”:
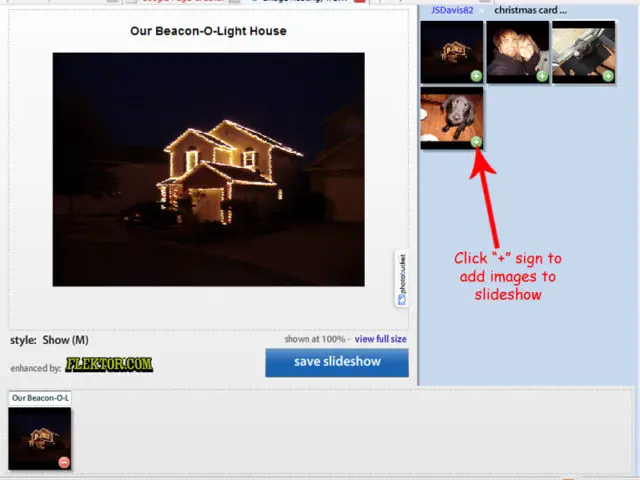
- Click the “plus” sign on the pictures you wish to appear in the “Selected Images” box
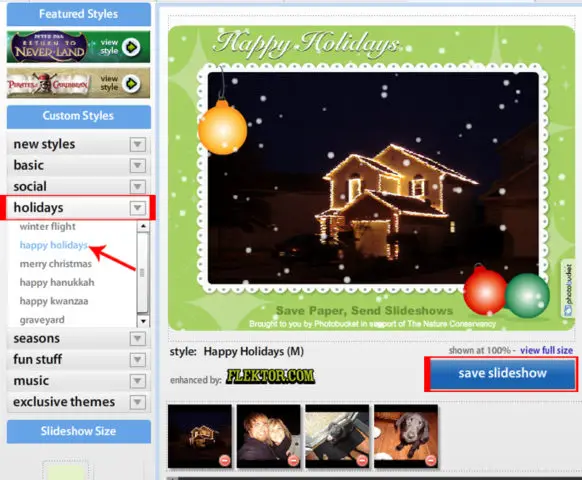
- Once you have the desired images in the box, click the “Holidays” tab in the “Custom Styles” menu. Now choose the style of your choice (I used “Happy Holidays”)
- After your slideshow looks the way you want it, click “Save Slideshow”
Step Three: Share eCard with Friends and Family:
- After you save your Christmas ecard, you have several options to share it with your loved ones.
- First, copy and paste the “Share URL” into the body of any email, providing a link for everyone on your mailing list to view your Christmas ecard slideshow on your PhotoBucket page.
- Second, click the “share” link on the upper left corner of your slideshow to share via email (from a PhotoBucket generated email), MySpace, Facebook, etc
- Third, go hardcore and make your own page that your friends can visit to view your Christimas ecard. This option is also free!
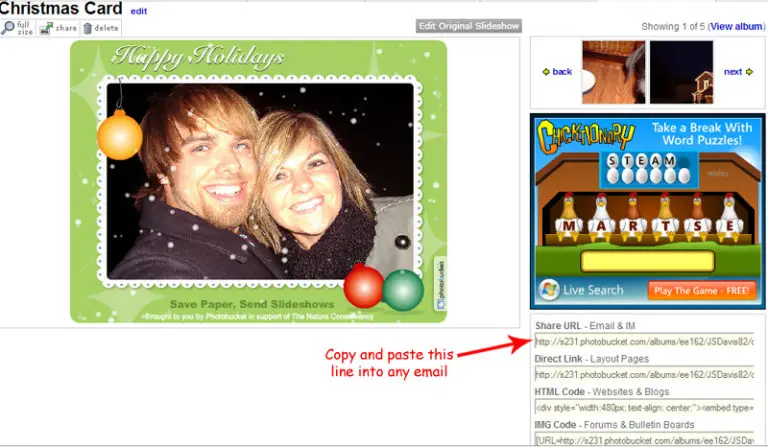
If you just want to send an email with the link to visit your Christmas ecard slideshow on PhotoBucket, then YOU’RE DONE! Happy Holidays and congratulations on saving a lot of money and trees!
Be sure to share a link to your virtual Christmas eCard slideshow in the comments
If you want to take a little extra time to really spiff up your ecard, as I did on mine, keep reading…
P.S. Resist the urge to attempt hacking the actual flash code to display the ecard directly in the email body! It WILL NOT work. Find out why at The Truth About Flash in Email. I spent many hours trying (and failing) to do just this before I found this article.
How To Host Your Christmas eCard Slideshow on Its Own Page…FOR FREE:
*Warning, some technical jargon ahead…but it’s not too bad. You can do it. I believe in you.*
Google has a basic web page creator called Google Page Creator. This is the answer to your free hosting needs.
“But they only have a few crappy non-customizable templates? How do you make it look like yours?”, you ask. Google Page Creator Tips and Tricks has your solution.
Simply download and plug in some snowflake background images from EOS Development and you’ve got your backgrounds!
I actually originally created my ecard’s page in GPC (so I know it works) before I came to my senses and realized, “Oh man, I’ve got my own domain and hosting account with plenty of space. Why don’t I use it instead?”
Now that I’ve told you how to create your own page on GPC, I’m gonna save you some work and provide you with the template file I used for my Christmas ecard:
Download GPC Christmas ecard template (.css)
Follow the simple instructions on the above linked GPC Tips and Tricks page to link to that style sheet (sounds hard, but it’s not at all).
- Don’t forget to plug in your own slideshow’s info.
- Copy and paste the “HTML and Web page” line of code from PhotoBucket instead of the “IM and Email” line previously mentioned.
If you have your own domain and hosting account somewhere, I’m gonna assume you know how to FTP a basic html file, so here’s the code for that option. It’s in .txt format, so be sure to rename it with .html before you FTP:
Download FTP Christmas ecard template (.txt)
Note that neither file will validate…especially the .txt for FTP to your root domain. That said, I admit the code is pretty messy, but hey it’s only up for a few weeks and viewable to friends and family…so don’t worry about it too much ;-).
If you get stuck and need some help, feel free to contact me.
That’s it. Don’t forget to share a link to your virtual Christmas eCard slideshow in the comments!

