What’s the one thing you’re sure to have in ample supply after the various Christmas festivities and New Year’s Eve parties?
Empty liquor bottles.
Sure, you could send them on their way to the recycling station, but I’m a much bigger fan of giving old things new life through some simple DIY.
Back in August we showed you 4 DIY ideas for empty wine bottles (which went on to be one of our most wildly popular posts of 2009), but today we’re adding one more idea to that list.
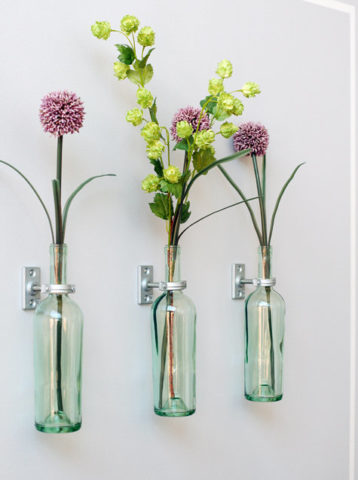
The project: Beautiful wall-mounted wine bottle vases.
Does this DIY project look kind of similar to the stunning wine bottle tiki torch one? Well it should, it is an adaptation of it…but this one is dressed up a bit to be suitable for interior decor.
Lindsay Landis and Taylor Hackbarth, the hubby and wife behind Purr Design came up with this idea – and hit a DIY home decor home run.
How much will these wine bottle vases set you back? A mere $5 per vase (not counting the cost of the actual wine…). That’s cheap enough to be easy on everyone’s post-Christmas budget.
Here are the instructions and helpful info from Lindsay:
You will need (per vase):
- (1) Empty wine bottle of your choice
- (1) Top plate connector/ceiling flanges (3/8″ size)
- (1) 1″ split ring hanger
- (2) screws to fit and hold the top plate connector (you may also want drywall anchors if you are not mounting directly into studs or another material)
- (1) piece of 3/8″ threaded rod, cut into 2 1/2″ pieces.
- 1/2″ double sided foam mounting tape (optional – if your bottle’s neck is smaller than 1″, like ours were)
- Silk flowers of your choice.
1. With a hack saw, cut your threaded rod down to size. Ours were about 2 1/2″ long, as we didn’t want our bottles hanging out too far from the walls. If you are hanging multiple bottles, just be sure you cut your pieces to equal sizes.
2. Position the top-plate connector on your wall, and mark the holes where the screws will go. Pre-drill the holes, insert any necessary drywall anchors, and then attach the plate to the wall.
3. Screw in your cut rod pieces, and then your split ring hanger.
4. If your wine bottle has a narrow neck (the 1″ split ring is loose around it and doesn’t fit snugly), apply a layer or two (as needed) of foam mounting tape to the neck of the bottle where it will be held by the split ring. Remove the backing from the other side of the tape, position the bottle in the split ring, and tighten the screws to secure in place. Pop in your flowers and voila!
Notes: We had quite a time finding the proper hardware. I think we went to a total of 3 Lowes around the city before we found them in stock and in the right size. Some stores had them in the Plumbing section, others had them in the Electrical. We’ve seen the connector piece called both a Top Plate Connector and a Ceiling Flange, who knows what it is actually called. The hardware (except for the threaded rod) comes in either copper or zinc (silver) finish, so you can choose whichever would best match your decor (or break out the spray paint).
How easy is that?! Will you be turning any of your empty wine (or other liquor) bottles into some chic tiki torches or vases this weekend?
If some nifty home decor DIY isn’t your style, you could geek out and make a PC or home server from an empty whiskey bottle instead.
[Source: Lifehacker]


