Happy Earth Day! What better way to celebrate than to start your own garden in a raised bed?
Raised beds are super easy to build and last for many, many, hassle-free years if you select the proper construction materials.
Let us show you how easy and fun it can be…

Everyone loved the container garden I built from reclaimed shipping pallets last year, but the thin and untreated pallet wood didn’t weather quite as well as I’d have liked.
The pallet garden was a fun project to tackle, but this year I decided to replace it with a little more traditional raised bed garden.
I also took this opportunity to more than double the size of the garden.
How To Build a Raised Bed Garden
Materials needed:
- Cedar boards
- Galvanized screws, lag bolts, or stakes (depending on construction method)
- Circular, table, or miter saw (if you don’t have any of these, a hand saw works just fine)
- Power drill
- Tape measure
- Square or speed square (a ruler would be a sufficient alternate too)
- Dirt and veggies of choice
The most important factor to building a raised bed that will last for many years is to use cedar wood for the frame. Cedar is expensive, but don’t let that deter you.
You will probably find cedar boards somewhere between $18-$35 per 2x8x8 board. Check your local landscape companies and nurseries. Most big box home improvement stores do NOT stock cedar lumber.
Why Is Cedar So Important?
Cedar is naturally resistant to rot and decay. Pine lumber must be pressure-treated with lots of nasty chemicals to achieve this property.
Many people choose to use regular untreated pine for their raised bed construction. With the combination of constant contact with the ground, exposure to the elements, and the increased exposure to moisture from garden watering, untreated pine will last 2-3 years.
Compare that to the 10 to 15 years that cedar will last under the same conditions, and it’s worth the money to splurge for proper cedar boards.
With cedar, you get the added bonus of that magnificent smell too.
Raised Bed Garden Instructions
- Decide on the dimensions you want your garden to be.
- Measure your boards with and use a speed square (or ruler) to draw a nice, straight mark on your boards
TIP: I built mine a little hastily, but if I did it over again, I would definitely use lap joints (sometimes called a corner lap) to join the boards’ ends together. This method is stronger, very easy to do, and looks much better than a typical butt joint. - Once your boards are cut to length, assemble them on a flat and level surface with galvanized screws. If you used lap joints, you may wish to use galvanized lag bolts instead.
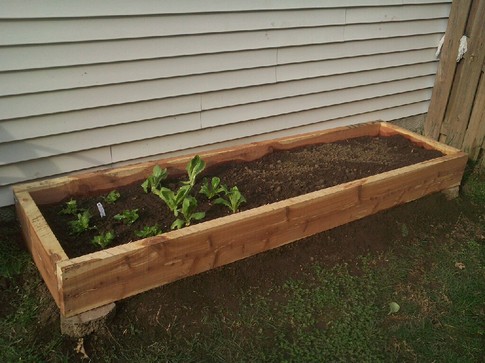
- Place your raised bed garden frame in the desired location and level it, if needed. I used left over landscaping bricks to level mine.
- Fill with local topsoil and organic compost and plant those veggies!
That’s about as simple as you can get right there.
Is It Time To Plant?
If you live in Zone 6 or higher you can construct your raised bed and plant your veggies now.
If you live in Zone 5 or lower, I’d wait until mid or late May.
Don’t know what zone you live in? Check the Wikipedia page on Hardiness Zones.
If you haven’t figured it out yet, the above picture is the finished product of my new raised bed garden.
Have you ever built a raised bed garden? What did you learn in the process? Maybe we can all learn a little something from each other.


